
3.1 — Verify the GitHub MCP Server
This repository already has the GitHub MCP Server configured in .vscode/mcp.json. When the Codespace starts, VS Code will automatically check the connection.
Open .vscode/mcp.json and confirm that the following configuration is present:
{
  "servers": {
    "github-mcp-server": {
      "type": "http",
      "url": "https://api.githubcopilot.com/mcp/"
    }
  }
}
Click the tools button in the Copilot Chat input area (to the right of the model picker) and confirm that the github-mcp-server tools (Issues / PRs / code search, etc.) appear in the list.
⏱ About 1 minute
3.2 — Add the Context7 MCP Server
Context7 is an MCP Server that pulls the latest official documentation for libraries and frameworks into Copilot. Recommended when working with fast-moving frameworks like Astro / Tailwind / TypeScript.
- Open the command palette with Cmd+Shift+P (or Ctrl+Shift+P on Windows/Linux)
- Type and select "MCP: Add Server…"
- For the transport, select "HTTP"
- Paste
https://mcp.context7.com/mcpas the URL - When prompted for the Server ID, change the default
my-mcp-server-xxxxxxxxtocontext7(important: this makes it easier to identify in Copilot Chat's#completion and tool list) - For the save location, select "Workspace"
After installation, confirm that context7 has been added to .vscode/mcp.json:
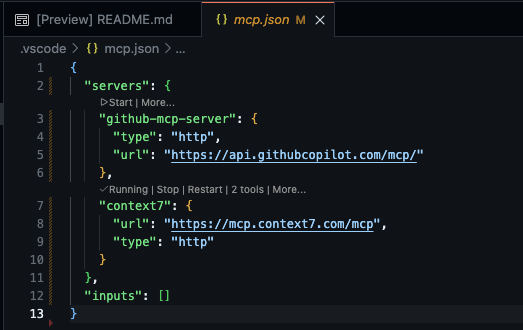
When you open .vscode/mcp.json, a small status indicator like Running | N tools appears above each server. If you see 2 tools next to context7 (resolve-library-id and get-library-docs), the connection succeeded. If not, click Start.
To verify it works, try the following in Copilot Chat:
Use Context7 to summarize the latest documentation for Astro content collections.⏱ About 2 minutes