Welcome to the GitHub Copilot Workshop!

In this workshop, you'll get hands-on experience with the simple concepts introduced in the Copilot Playbook.
Working through the PLAN → CODE → REVIEW → TEST & SECURE → OPERATE phases, you'll use GitHub Copilot to build a lightweight version of the Playbook — a site that renders Markdown beautifully — together with Copilot.
Today's Goals
- PLAN: Wire up Copilot with "context", "rules", and "templates" using MCP, Instructions, and Skills
- CODE: Design and implement the site using Copilot Chat (Plan / Agent mode)
- REVIEW: Automate PR reviews with Copilot Code Review
- TEST & SECURE: Ensure quality and security with Dependabot, CodeQL (GHAS), and GitHub Actions (Playwright)
- OPERATE: Embed AI into daily operations using Cloud Agent, Copilot CLI, and Agentic Workflow
Prerequisites
Please have the following ready:
- A private Organization with the following features enabled:
- GitHub Actions
- GitHub Copilot (Pro+ / Business / Enterprise)
- GitHub Advanced Security (GHAS)
- Permission to create repositories within the Organization
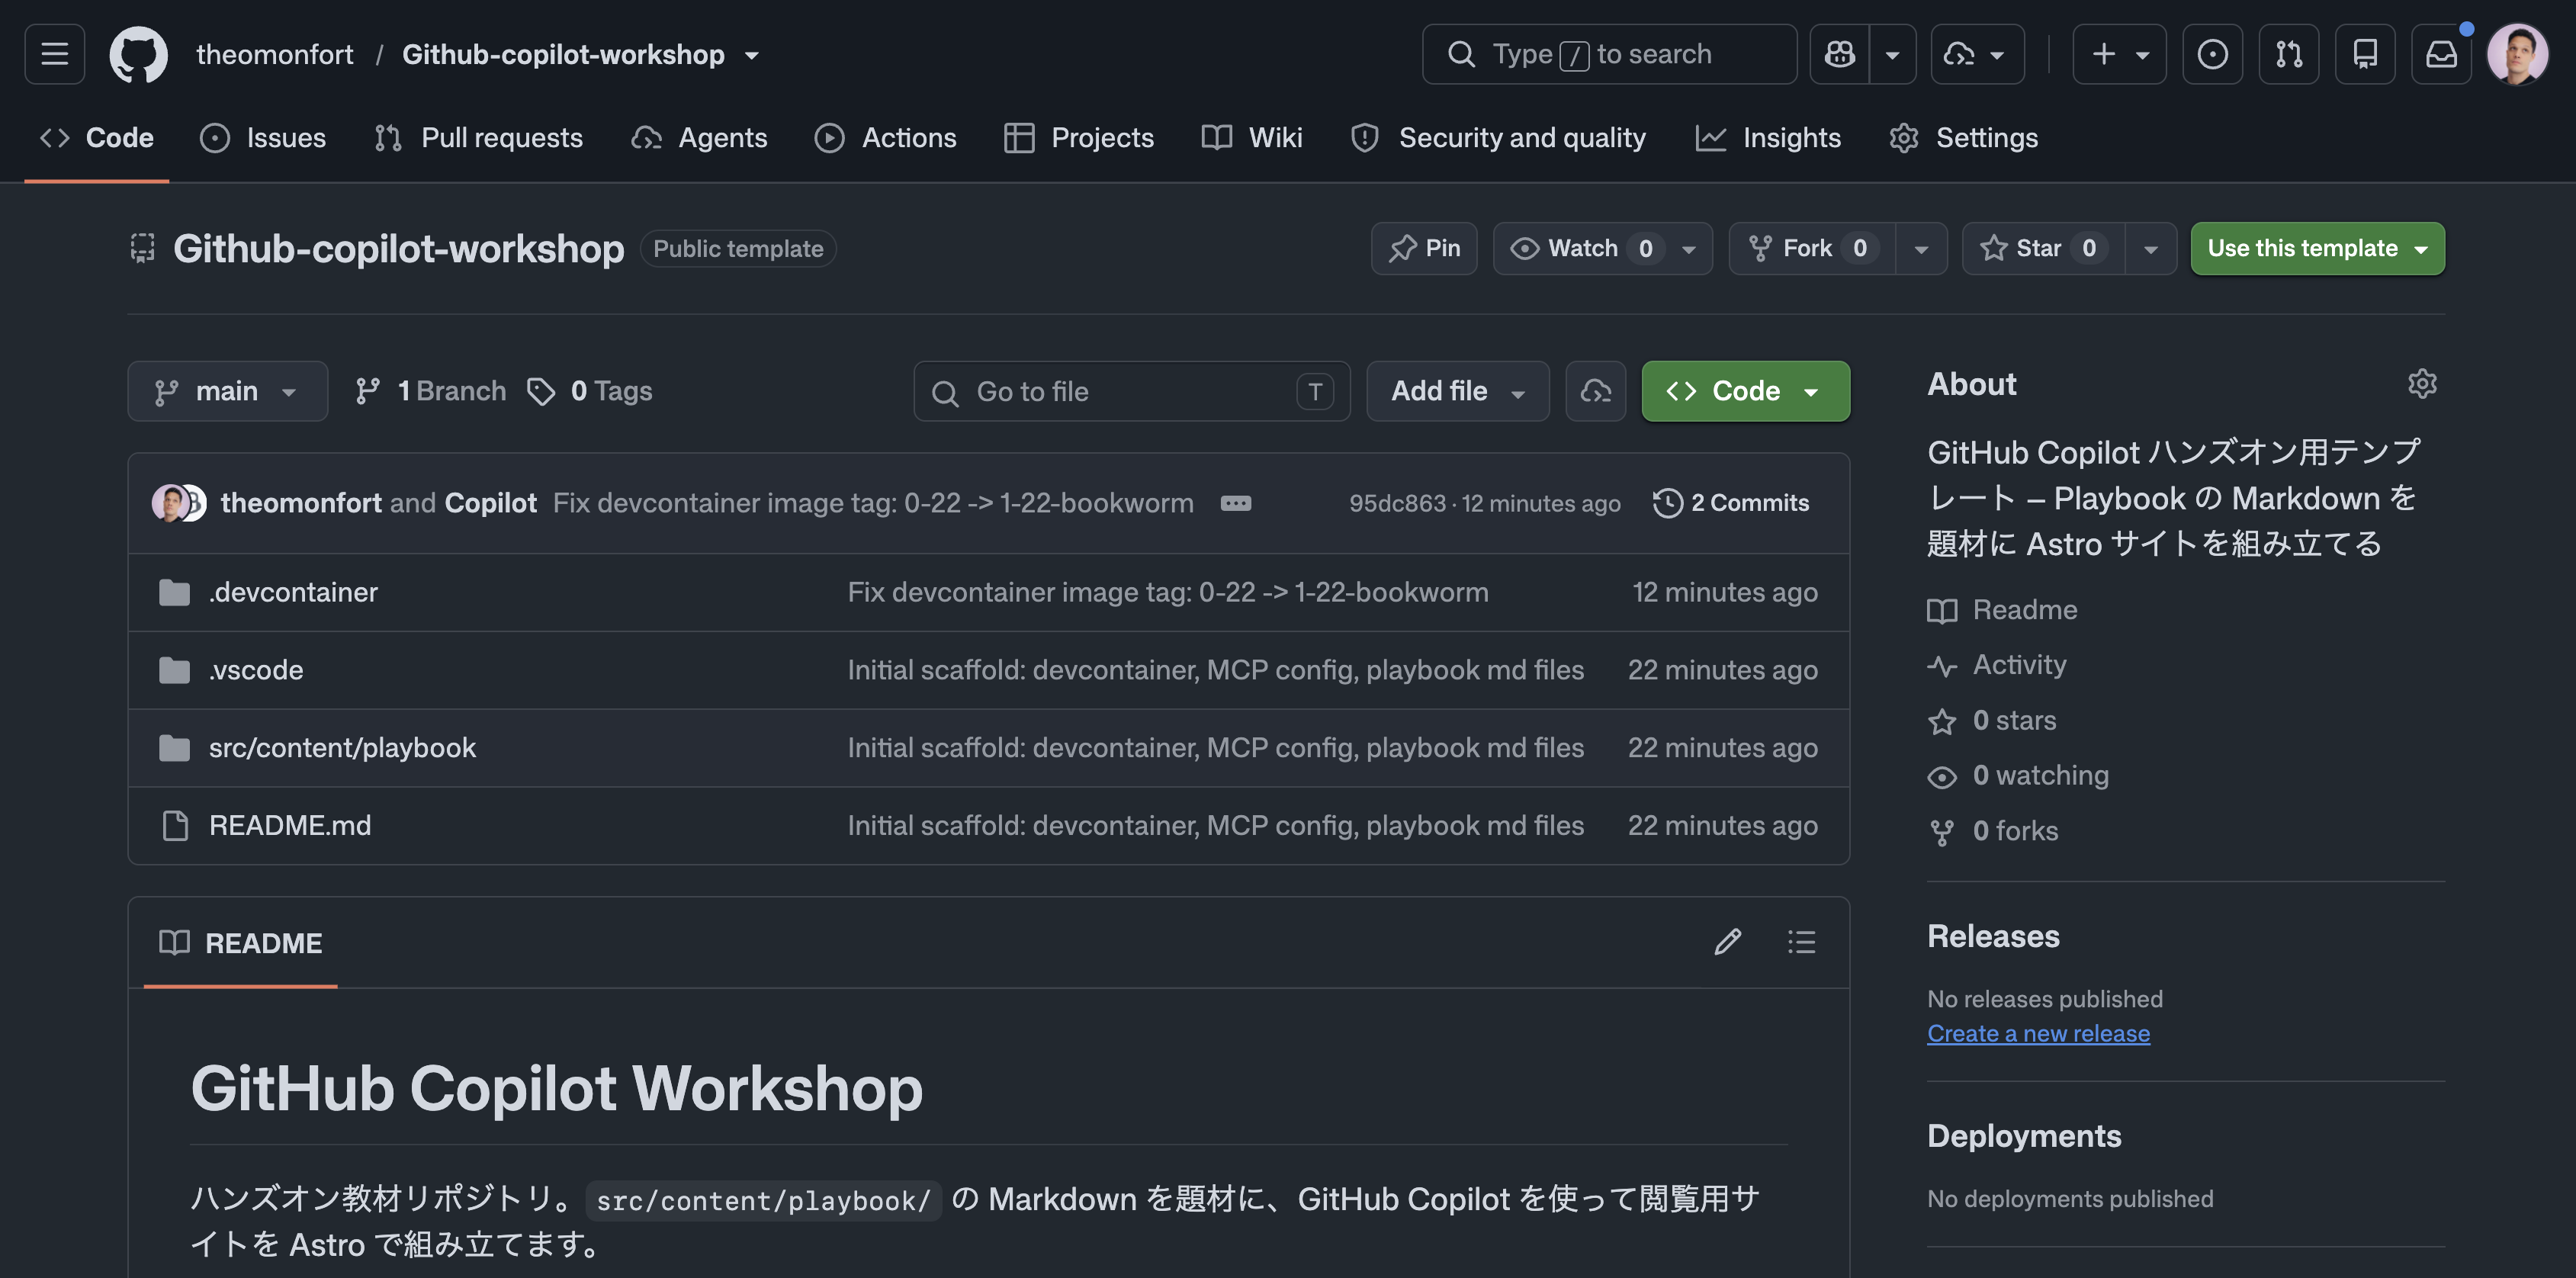
This workshop uses the following GitHub repository:
Project URL: https://github.com/theomonfort/Github-copilot-workshop
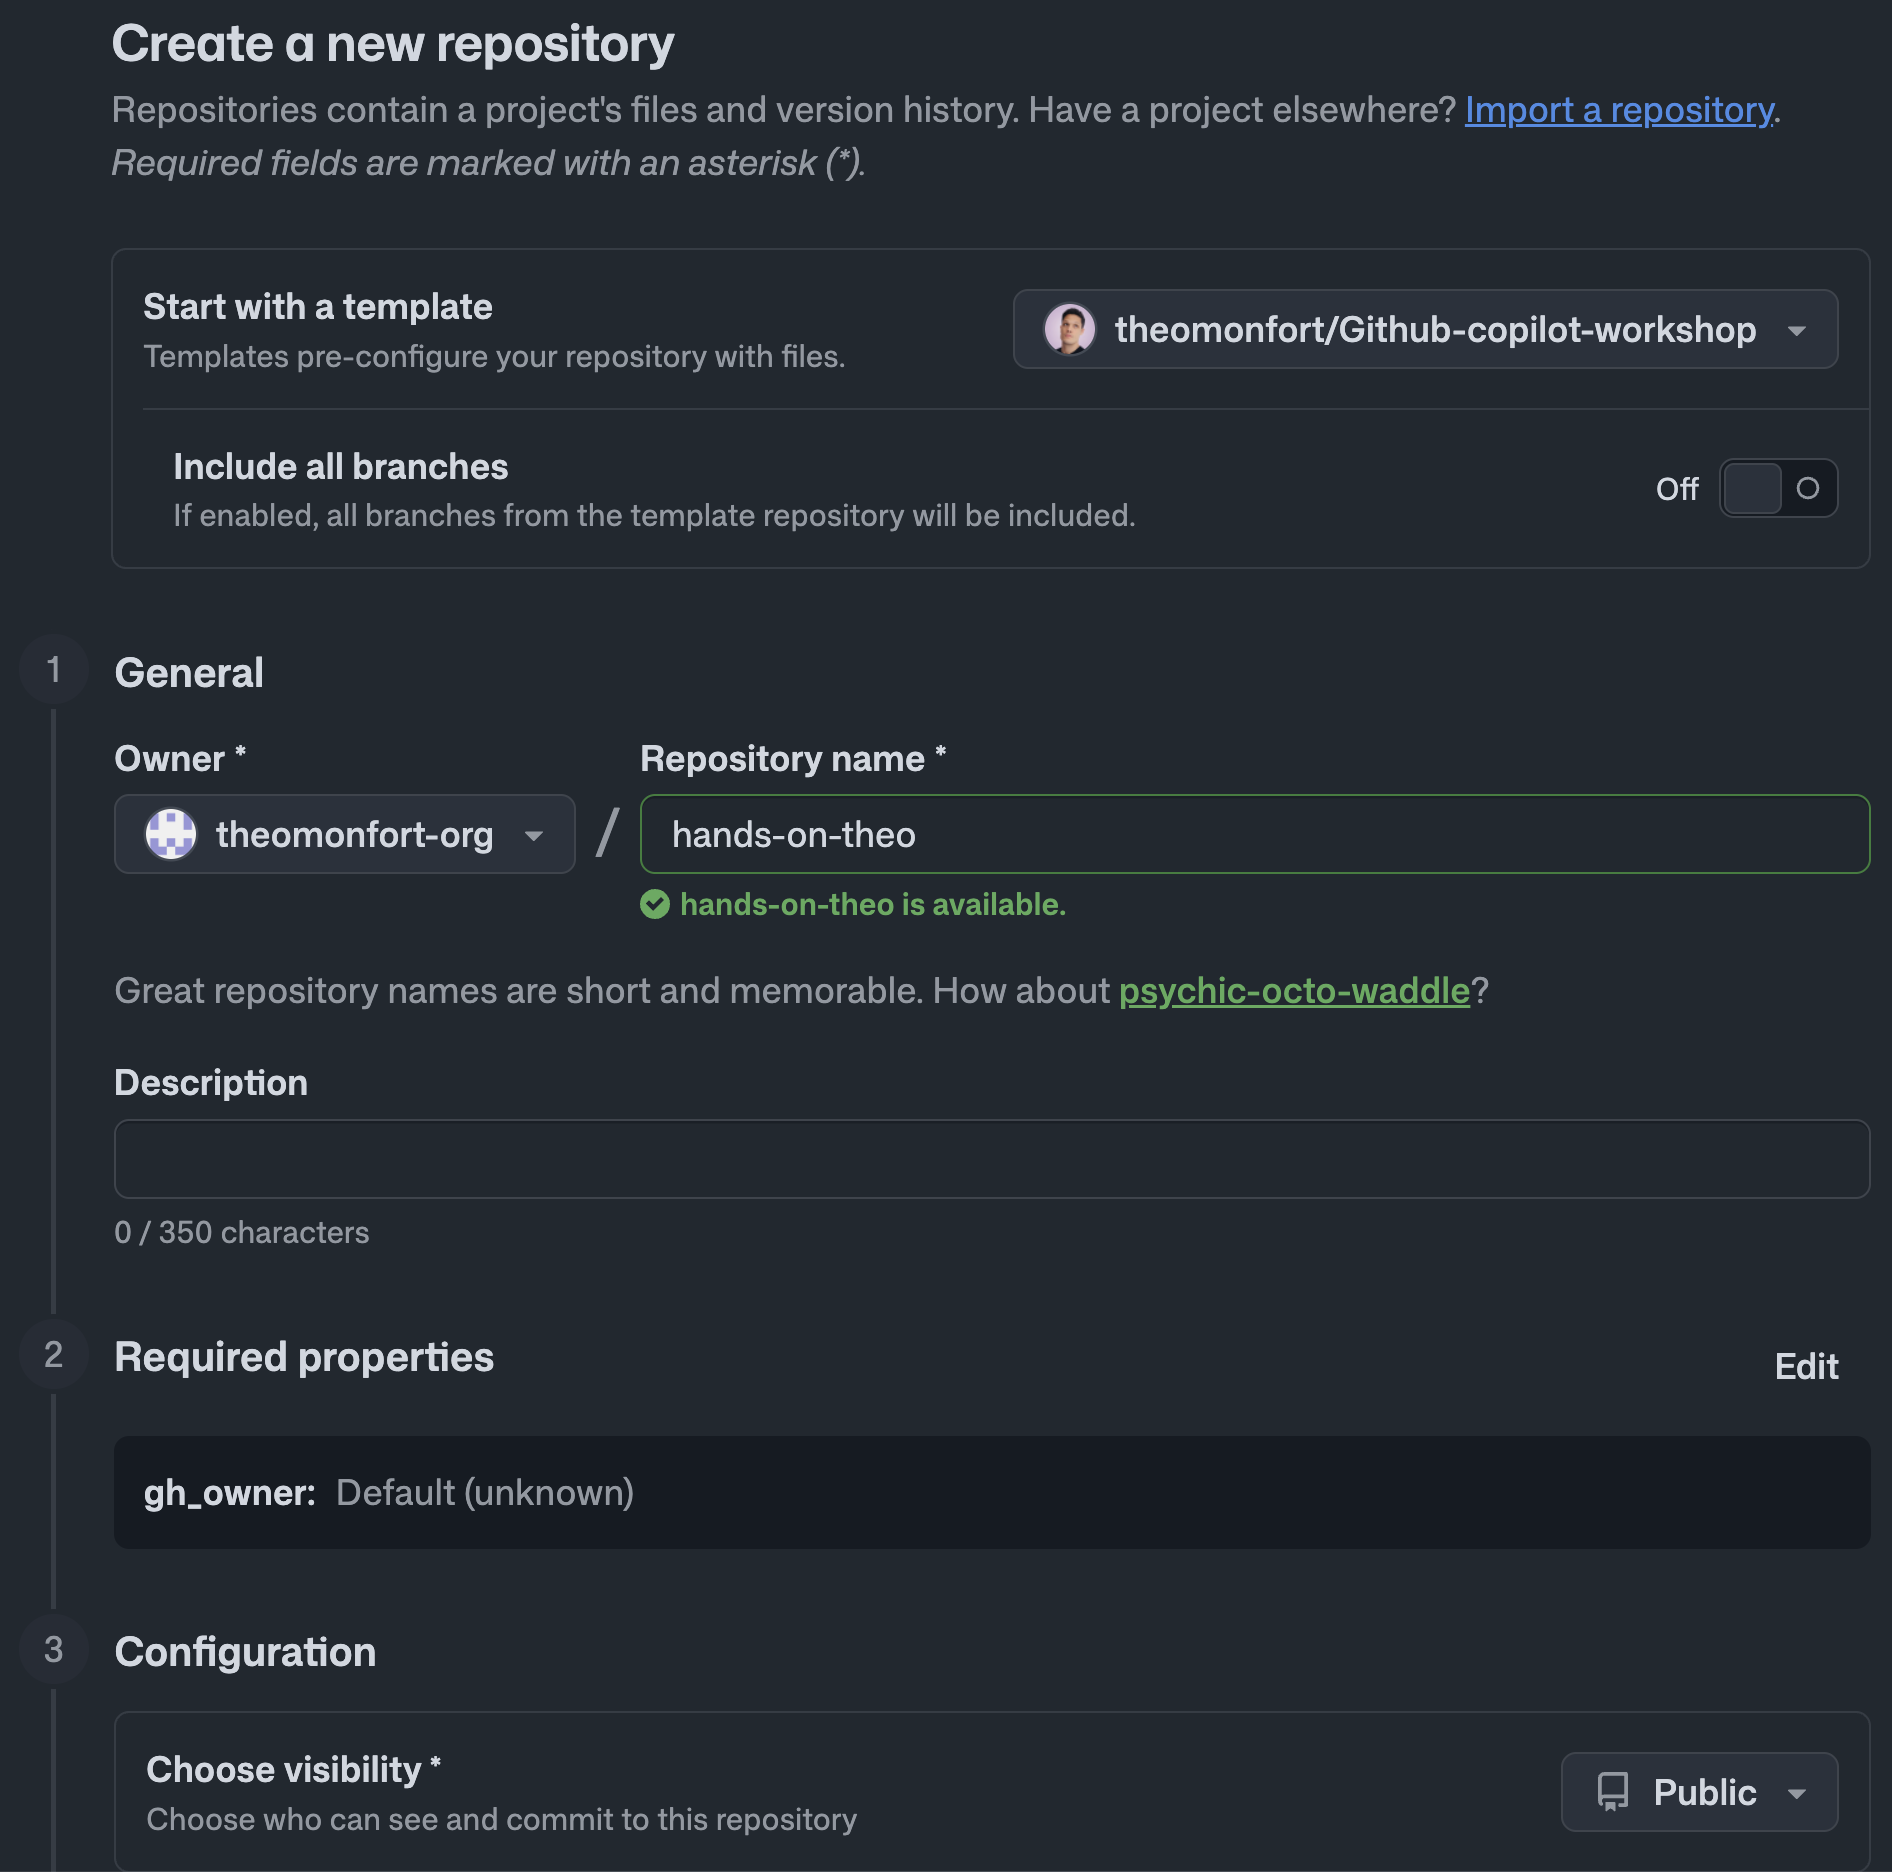
Step 1: Create a Repository from the Template
- Open the project URL in your browser
- Click Use this template in the top right, then select Create a new repository
- On the repository creation screen, configure the following:
- For Owner, select an Organization with Copilot / Actions / GHAS / Codespaces enabled
- Set Visibility to Public
Repository name
- Enter any name you like (e.g.
hands-on-yourname)
- Click Create repository
Step 2: Launch Your Dev Environment with Codespaces
- On your new repository page, click the green Code button
- Select the Codespaces tab
- Click Create codespace on main
The DevContainer automatically sets up a Node.js 22 environment and pre-installs the following:
- GitHub Copilot & Copilot Chat extension
- GitHub CLI (
gh) - GitHub MCP Server (
.vscode/mcp.json, auto-detection enabled) - Copilot CLI (
@github/copilot) - pnpm (package manager)
- gh-aw (Agentic Workflow CLI)
- Playwright (with Chromium browser)
Step 3: Review the Source Material
Markdown files are located in src/content/playbook/. These are the raw materials for today's site.
Open src/content/playbook/ in the VS Code Explorer and browse through a few files. Later, you'll have Copilot turn these into a site where users can browse the content in grid, detail, and presentation views.

In this step, you'll verify and add MCP (Model Context Protocol) Servers that give Copilot access to external tools. With MCP in place, Copilot can directly create Issues, look up the latest docs, and more.
3.1 — Verify the GitHub MCP Server
This repository already has the GitHub MCP Server configured in .vscode/mcp.json. VS Code automatically prompts to connect when the Codespace starts.
Open .vscode/mcp.json and verify the following config is present:
{
  "servers": {
    "github-mcp-server": {
      "type": "http",
      "url": "https://api.githubcopilot.com/mcp/"
    }
  }
}
Click the 🔧 tools button in the Copilot Chat input area (to the right of the model selector) and confirm that the github-mcp-server tools (Issues / PRs / code search, etc.) appear in the list.
⏱ ~1 min
3.2 — Add the Context7 MCP Server
Context7 is an MCP Server that feeds Copilot the latest official documentation for libraries and frameworks. It's essential for this workshop, which uses fast-moving frameworks like Astro, Tailwind, and TypeScript.
- Open the command palette with Cmd+Shift+P (or Ctrl+Shift+P on Windows/Linux)
- Type and select "MCP: Add Server..."
- Select "HTTP" as the transport
- Paste
https://mcp.context7.com/mcpas the URL - When asked for a Server ID, change the default
my-mcp-server-xxxxxxxxtocontext7(important: makes it easy to identify in Copilot Chat's#autocomplete and tool list) - Select "Workspace" as the save location
After installing, verify that context7 has been added to .vscode/mcp.json:
{
  "servers": {
    "github-mcp-server": { "type": "http", "url": "https://api.githubcopilot.com/mcp/" },
    "context7": {
      "type": "http",
      "url": "https://mcp.context7.com/mcp"
    }
  }
}
When you open .vscode/mcp.json, a small status indicator like Running | N tools appears above each server. If you see 2 tools next to context7 (resolve-library-id and get-library-docs), the connection is successful. If it doesn't appear, click Start.
To verify it works, try the following in Copilot Chat:
Use Context7 to summarize the latest documentation for Astro's content collections.
⏱ ~2 min
Instruction files are documents that give Copilot persistent rules at the repository or file level. Every team member's Copilot will follow the same conventions automatically.
In this step, you'll create two types of Instruction files:
.github/copilot-instructions.md— always applied across the whole repository (language, stack, conventions).github/instructions/frontend.instructions.md— a Path Instruction applied only to frontend files (design tokens)
4.1 — Create the Repository-wide Instruction
Paste the following prompt into Copilot Chat:
Please create .github/copilot-instructions.md. Write everything in English.
Use the following content:

# Copilot Instructions

## Language

- Write all responses, comments, commit messages, and PR descriptions in **English**.

## Stack

- **Astro** only. Do not use Next.js, React Router, or SvelteKit.
- Use Astro components (.astro) for pages and layouts.
- Use Astro **content collections** (src/content/) for Markdown content.
- Use Tailwind CSS for styling. Scoped <style> blocks where needed.
- Use TypeScript everywhere (.ts, .astro frontmatter).

## Conventions

- Pages go in src/pages/.
- Reusable UI goes in src/components/.
- Markdown goes in src/content/<collection>/*.md. Schema in src/content.config.ts.
- Package manager is **pnpm**.

## Documentation Reference (always follow)

Before writing code for any external library, framework, or language, **always call the following Context7 MCP tools first, then implement**:

1. Use `resolve-library-id` to resolve the library ID.
2. Use `get-library-docs` to fetch the latest documentation.
3. Implement based on the retrieved documentation.

Applies to: Astro (content collections, integrations, routing), Tailwind CSS, Mermaid, Playwright, pnpm, etc.

**Prohibited**:
- Do not write code from memory alone.
- Do not skip Context7 by assuming you "know" it — check the docs every time, even for familiar tech.
- Library APIs, config formats, and CLI flags may be outdated. Verify with Context7 rather than guessing.
⏱ ~2 min
4.2 — Create the Frontend-specific Path Instruction
Create a Path Instruction that applies only to specific file patterns. VS Code will only pass this rule to Copilot when you're touching files that match the applyTo glob.
Paste the following prompt into Copilot Chat:
Please create .github/instructions/frontend.instructions.md.
Write everything in English. Use the following YAML frontmatter at the top:

---
applyTo: "**/*.{astro,css,tsx,jsx,ts,js,html}"
description: "Frontend design tokens (retro JRPG theme)"
---

Include the following content in English:

# Frontend Design Rules

When working on styles, components, or layouts, always apply the following tokens.

## Theme

Retro JRPG / cyberpunk arcade. Dark backgrounds with neon accents and pixel-style typography.

## Colors

| Role              | Hex        | Usage                             |
| ----------------- | ---------- | --------------------------------- |
| Background (base) | `#05060f`  | body / page                       |
| Background (panel)| `#0a0e27`  | cards, sidebar                    |
| Neon magenta      | `#ff2e88`  | primary accent, active            |
| Neon cyan         | `#00f0ff`  | secondary, hover, links           |
| Amber             | `#ffb000`  | warnings, highlights              |
| Phosphor green    | `#9bbc0f`  | success, CRT-style text           |
| Text (normal)     | `#e6f1ff`  | body text on dark backgrounds     |
| Text (muted)      | `#7a8aa8`  | secondary text                    |

## Fonts

- Headings / UI: **`'DotGothic16'`** (pixel), fallback `monospace`.
- Body: **`'Noto Sans JP'`**, fallback `system-ui, sans-serif`.
- Code: `'JetBrains Mono', 'Menlo', monospace`.

Tailwind utilities: `font-pixel` (DotGothic16), `font-body` (Noto Sans JP).

## Effects

- Subtle CRT scanlines as a screen overlay.
- Neon glow: `text-shadow: 0 0 8px <color>` / `box-shadow: 0 0 12px <color>`.
- Borders: `1px dashed` or `2px solid` in neon colors.
- Keep contrast high. Soft pastel gradients are not allowed.

## Do Not

- Use light / white backgrounds.
- Use fully rounded (pill) shapes. Max border-radius is 4px.
- Use soft gray drop shadows. Only use glow (neon glow).
⏱ ~2 min
Agent Skills are reusable instruction sets that teach Copilot "how to handle specific tasks." They're summoned automatically when a prompt matches, so you never have to re-explain templates from scratch.
In this step, you'll install a Skill for writing well-structured Issues and use it to create one.
5.1 — Install the github-issues Skill
Install the github-issues Skill from theomonfort/skills. This skill includes multiple templates (bug report / feature request / task) and lets you write structured Issues complete with labels, priority, and dependencies.
Run the following in the VS Code terminal:
gh skill install theomonfort/skills github-issues
The CLI will ask you to choose a target agent and an installation scope:
- Agent: select
copilot(for GitHub Copilot Chat in VS Code) - Scope:
project(installs to this repository only)
After installation, .agents/skills/github-issues/SKILL.md will be added. Open it to see when Copilot will invoke this Skill and what templates it includes.
⏱ ~1 min
5.2 — Create an Issue Using the Skill
Use the github-issues Skill to create one structured Issue. Enter the following prompt in Copilot Chat (GitHub MCP is already enabled from the previous step, so Copilot will naturally call the Issue creation tool):
Use the github-issues skill to create the following Issue in this repository.
Make it a structured feature request including user story, acceptance criteria, and implementation notes.

Title: Add English support on the website

Background:
- The site is currently all in Japanese. We want to reach engineers globally.

Requirements:
- Add an English version using Astro's i18n routing (`/en/...`). Fall back to Japanese.
- Extract UI strings like navigation and button labels into src/i18n/ja.ts / en.ts.
- Structure src/content/ so both ja and en versions of Markdown can coexist.
- Add a language toggle to the site header.

Acceptance Criteria:
- The full site is readable in English at the /en/ route.
- Pages without a translation fall back to Japanese and show a warning banner at the top.
- Existing SEO (sitemap, OG tags) outputs correctly for both languages.

Labels: feature, i18n, frontend
⏱ ~2 min

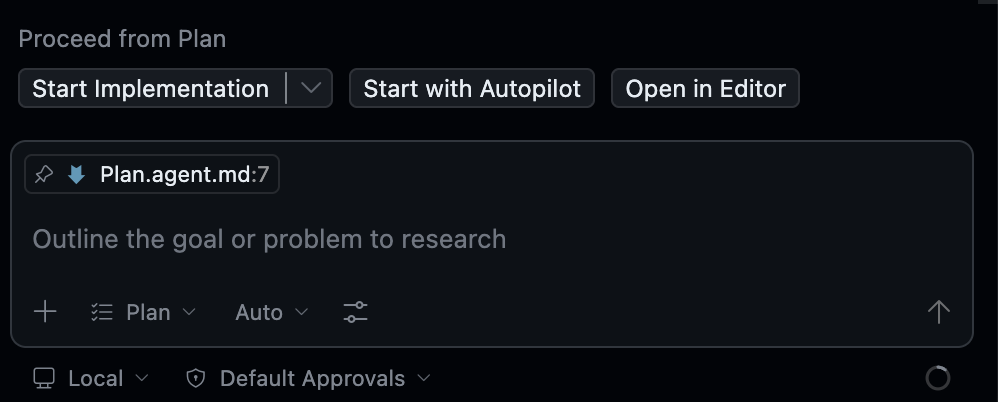
The PLAN harness (MCP, Instructions, Skills) is all set. Now it's time to use Copilot Chat's Plan mode to draft an implementation plan, then Agent mode to build it all at once.
6.1 — Switch the Model to Claude Opus 4.6
Click the model selector at the bottom of the Copilot Chat panel and select Claude Opus 4.6.
6.2 — Switch to Plan Mode
Select "Plan" from the mode switcher in Copilot Chat.
6.3 — Request an Implementation Plan
Copy and paste the following prompt into Copilot Chat as-is:
Please build a small Astro site (English only; no i18n or multi-language support needed). Work on a new branch (e.g. feature/playbook-site).

The site is for viewing src/content/playbook/*.md in **Presentation mode (slideshow)**. Skip the index and detail pages — show the Presentation UI right from the start.

- Treat each Markdown file as one "section". Within a section, split on `##` headings so each heading becomes one slide.
- Keyboard navigation:
    * `←` `→` ... move between slides within the same section
    * `↑` `↓` ... move to the previous / next section (md file)
- Show a table of contents for all sections in a left sidebar, highlighting the current section.
- Each section's theme color comes from the `color:` field in the md file's frontmatter and is applied to the slide background, title, and sidebar accent. Fall back to a default color if not present.
- Render Mermaid diagrams (` ```mermaid `) inside Markdown.
Copilot may ask a few clarifying questions (e.g. package manager, UI framework, deploy target). Since it has read copilot-instructions.md, it should default to Astro / Tailwind / pnpm — just fill in anything it's missing.
⏱ ~3 min
6.4 — Implement with Autopilot
When you're happy with the plan, click "Start with Autopilot" to kick off implementation.
⏱ ~15–20 min
Copilot will automatically:
- Initialize the Astro project (pnpm)
- Define the playbook collection in
src/content.config.ts - Build the Presentation UI (slideshow)
- Wire up keyboard navigation (← → ↑ ↓)
- Create the left sidebar (section TOC + current section highlight)
- Apply per-section theme colors based on frontmatter
color - Render Mermaid diagrams
- Style everything with Tailwind using the design tokens
Once implementation is done, start the dev server to check it out:
pnpm dev
Click "Open in Browser" from the port forwarding notification to verify it works.

Once the implementation is working, before you open a PR, wire Copilot Code Review into your harness. The rules in copilot-instructions.md (language, stack, review criteria) will be automatically reflected in reviews.
7.1 — Enable Copilot Code Review Settings
First, check the Copilot Code Review settings.
- Repository Settings → Copilot → Code review
- Enable the following:
- Use custom instructions when reviewing pull requests → On
7.2 — Create an Automatic Review Ruleset
Configure Copilot to automatically review code when a PR is opened. The fastest way is to create a Ruleset directly from the Code review settings page.
- On the Settings → Copilot → Code review page, find the Automatic code review section
- Click Add a ruleset (or Create ruleset) → The Ruleset creation screen opens with Automatically request Copilot code review already enabled
7.3 — Open a PR and Check the Results
Push the site you built in section 6 to remote and open a PR. The Ruleset you set up in 7.2 will trigger Copilot Code Review automatically. Let Copilot Chat's Agent mode handle it:
Commit and push the changes on the current branch, then open a PR against main. Write the title and body in English, summarizing the changes.
Once the PR is open, Copilot Code Review runs automatically (⏱ ~5 min):
- ✅ Pull Request Overview — a summary comment on the whole PR
- ✅ Code suggestions — specific improvement suggestions per file
7.4 — Apply the Review Suggestions
There are two ways to apply Copilot's review suggestions:
- Commit suggestion — commit individual suggestions one by one
- Fix batch with Copilot — fix all suggestions at once (recommended)
Clicking Fix batch with Copilot automatically creates a new PR with all the fixes applied (⏱ ~15 min).
- First, merge the new fix PR
- Then merge the original PR

Enable Dependabot to continuously check for dependency vulnerabilities. Setup takes just a few clicks.
8.1 — Enable Dependabot
- Repository Settings → Security and quality → Advanced Security
- In the Dependabot section:
- Enable Dependabot security updates
- Enable Dependabot version updates → an editor opens showing the
.github/dependabot.ymltemplate
- Change
package-ecosystem: ""in the template to"npm"(this repo uses the pnpm / npm ecosystem):version: 2 updates: - package-ecosystem: "npm" directory: "/" schedule: interval: "weekly" - Commit changes... → Select "Create a new branch and start a pull request" → create and merge the PR
Enable CodeQL to scan your code for security vulnerabilities using static analysis.
9.1 — Enable CodeQL
- Repository Settings → Security and quality → Advanced Security
- Tools → CodeQL analysis → Set up → Default → Enable CodeQL
To make sure the keyboard navigation on the Presentation site never breaks, write Playwright E2E tests and create an Actions workflow that runs them automatically on every PR.
10.1 — Write Tests for Presentation Mode
Enter the following in Copilot Chat (Agent mode):
Create a new branch `test-creation` and work on that branch.

Write Playwright E2E tests that verify the keyboard navigation of the Presentation site.

Assumptions:
- There are at least 2 entries in src/content/playbook/.
- Opening the site shows Presentation mode immediately.

Test cases:
1. Pressing `←` / `→` moves between slides within the same section (one slide per ## heading).
2. Pressing `↓` / `↑` moves to the next / previous section (md file).
3. The left sidebar shows all sections as a table of contents, with the current section highlighted.
4. When switching to a section with a different `color` in its frontmatter, the theme color (background, title, sidebar accent) changes.

File layout:
- Place tests in tests/e2e/presentation.spec.ts.
- Update playwright.config.ts if needed (baseURL, webServer config to start pnpm dev).

After writing the tests, run `pnpm exec playwright test` locally and confirm all tests pass.
⏱ ~5 min
10.2 — Create an Actions Workflow to Run Tests on PRs
Continue in Copilot Chat with the following:
Continue working on the same `test-creation` branch.

Create .github/workflows/test.yml.
Trigger it on PR creation and updates, and run the following steps:

1. Set up Node.js 22
2. Set up pnpm
3. Install dependencies
4. Install Playwright browsers (npx playwright install --with-deps chromium)
5. Run `pnpm exec playwright test`
6. On test failure, upload the Playwright report as an artifact
⏱ ~2 min
Open a PR and you'll see test.yml running in the Actions tab. Whenever Presentation mode behavior changes, this workflow will catch regressions early.
5.1 — Verify Copilot Settings
To use Cloud Agent, confirm the following settings:
- Click your profile icon in the top right of GitHub → Copilot settings
- Confirm that Copilot Cloud Agent is enabled
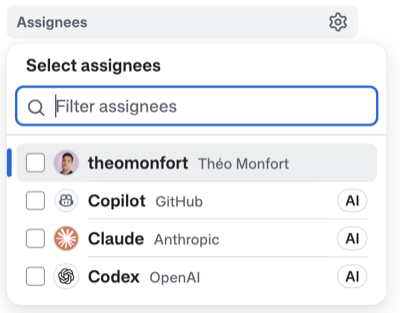
5.2 — Assign Cloud Agent to an Existing Issue
Open one of the Issues you created in Step 1.4 that you'd like Cloud Agent to implement.
- Open the Issue
- Click Assignees in the right sidebar
- Select and assign from Copilot (GitHub), Claude (Anthropic), or Codex (OpenAI)
At assignment time, you can customize:
- Additional prompt — add supplementary instructions to the Issue description
- Model selection — choose from Copilot / Claude / Codex
- Base branch — specify the branch to work from
5.3 — Review and Merge the PR
PRs created by Cloud Agent start in Draft state.
- Open the PR and review the content
- Click Ready for review to take it out of Draft
- Copilot Code Review starts automatically
- Once review is complete, merge the PR
5.4 — Pull the Latest Code and Check the Site
Once Cloud Agent's PRs are merged, pull the latest code in Codespace and verify the site.
git checkout main && git pull && pnpm install && pnpm dev
When the port forwarding notification appears, click "Open in Browser" to see the new features Cloud Agent implemented.
Let's put up guardrails with Hooks to prevent Copilot (Chat / CLI / Cloud Agent, etc.) from touching files you don't want modified — like .github/ config files, .env, and pnpm-lock.yaml. This is especially important before the next chapter, where you'll run multiple agents in parallel from the CLI.
Hooks let you inject arbitrary scripts before and after an agent calls a tool (PreToolUse / PostToolUse). Returning permissionDecision: deny from a PreToolUse hook physically stops the agent.
N.1 — Create .github/hooks/hooks.json
Create a new file at .github/hooks/hooks.json in the root of your repository and paste in the following:
{
  "version": 1,
  "hooks": {
    "PreToolUse": [
      {
        "type": "command",
        "matcher": ".*(edit|create|write|delete|remove|rename|move|patch|replace|insert|update|bash|shell|terminal|command|run|execute|apply).*",
        "bash": "node ./scripts/block-protected-paths.mjs",
        "cwd": ".github/hooks",
        "timeoutSec": 5
      }
    ]
  }
}
Key points:
- The
matcherrestricts the hook to mutating tools only (file writes and shell execution) — reads and searches are not blocked. bashis run relative tocwd. The script is created in the next step.
N.2 — Create the Blocking Script
Create a new file at .github/hooks/scripts/block-protected-paths.mjs and paste in the following:
import { stdin, stdout } from 'node:process';

const rawPayload = await readStdin();
const payload = parseJson(rawPayload);
if (!payload) process.exit(0);

const toolName = String(payload.tool_name ?? payload.toolName ?? 'requested');
const toolInput = payload.tool_input ?? payload.toolArgs ?? {};

const normalizedInput = JSON.stringify(toolInput).replaceAll('\\\\', '/');
const protectedPath = findProtectedPath(normalizedInput);
if (!protectedPath) {
  process.exit(0);
}

deny(`Repository policy: agents must not modify ${protectedPath}. The ${toolName} tool referenced ${protectedPath}.`);

async function readStdin() {
  const chunks = [];
  for await (const chunk of stdin) chunks.push(chunk);
  return Buffer.concat(chunks).toString('utf8').trim();
}

function parseJson(raw) {
  if (!raw) return null;
  try { return JSON.parse(raw); } catch { return null; }
}

function findProtectedPath(value) {
  const protectedPaths = [
    { label: '.github/', pattern: /(^|[\/\s"'`=:([{])(?:\.\/)?\.github(?:\/|$)/i },
    { label: '.env', pattern: /(^|[\/\s"'`=:([{])(?:\.\/)?\.env(?:$|[\/\s"'`),}\]])/i },
    { label: 'pnpm-lock.yaml', pattern: /(^|[\/\s"'`=:([{])pnpm-lock\.yaml(?:$|[\/\s"'`),}\]])/i },
  ];
  return protectedPaths.find(({ pattern }) => pattern.test(value))?.label;
}

function deny(reason) {
  const additionalContext = 'This hook blocks agent writes to protected repository configuration, environment, and lock files. Choose a different path or ask the user to make the protected-file change manually.';
  stdout.write(JSON.stringify({
    permissionDecision: 'deny',
    permissionDecisionReason: reason,
    additionalContext,
    hookSpecificOutput: {
      hookEventName: 'PreToolUse',
      permissionDecision: 'deny',
      permissionDecisionReason: reason,
      additionalContext,
    },
  }));
}
Key points:
- Protected targets:
.github/,.env, andpnpm-lock.yaml. - The output returns both Copilot CLI format (
permissionDecision) and VS Code format (hookSpecificOutput), so it works in either environment.
N.3 — Restart Copilot Chat
To load the Hook configuration, close your current Copilot Chat session and open a new one (💬 icon → "+" for new chat).
N.4 — Test the Agent (Intentionally Trigger a Block)
In the new chat, enter the following:
Create a new file called .github/test.md with the content "hello hooks".
Expected behavior:
- The agent tries to call the
create/writetool. - Hook fires → detects
.github/path → returnspermissionDecision: deny. - A rejection message like "Repository policy: agents must not modify
.github/" appears in the chat. - The file is not created.
⏱ ~10 min
Copilot CLI is an interactive AI assistant that runs in the terminal. It can autonomously generate code, review it, refactor it, and more — all without opening VS Code.
Here, you'll use /fleet from the CLI to implement the Issues you created at the end of Part 6 in parallel.
Key Commands
Command | Description |
| Select the AI model (Claude / GPT, etc.) |
| Switch mode (plan / agent) |
| Allow tool execution without confirmation (Autopilot) |
| Run multiple agents in parallel |
| Check the status of running fleet tasks |
| Analyze session history and usage patterns |
| Resume a previous session |
12.1 — Start Copilot CLI
First, pull the latest code. Cloud Agent and Code Review PRs should have been merged by now, so update your local branch:
git checkout main
git pull
Then start Copilot CLI in the VS Code terminal:
copilot
12.2 — Select a Model and Enable Autopilot
Inside the CLI, run:
/allow-all
/model
Select the highest-performing model (e.g. Claude Opus 4.6).
Then press Shift+Tab to switch to Agent (Autopilot) mode.
12.3 — Implement Issues in Parallel with /fleet
Use the CLI to implement the 3–5 Issues created in Part 6 in parallel. The prompt also includes an instruction to rubber-duck review with a different model (Codex).
/fleet For all open Issues in this repository with a label of bug or enhancement,
assign one fleet agent per Issue and implement them in parallel.

Each agent should follow this flow:
1. Create a branch matching the Issue number (fix/<number>-<slug>)
2. Implement the fix
3. Leave it in a state that can be verified with pnpm dev
4. Commit and open a PR (include `Closes #<number>` in the body)

Once all PRs are created, switch to the **GPT-5 Codex** model
(using a different model from the Claude that implemented the code, to avoid blind spots)
and do a rubber-duck review of all the created PRs.
Focus on: design blind spots, logic bugs, missing Issue requirements, consistency with existing code,
missing tests and error handling. Ignore style and minor nits —
list only genuinely important issues, one concise note per PR.
⏱ ~10–15 min
The CLI spawns multiple fleet agents, each autonomously implementing on its own branch and creating a PR. Progress streams to the terminal, and the rubber-duck review from the alternate model is printed at the end.
To check progress during or after execution:
/tasks
This shows the status (running / complete / failed) and current step for each fleet agent.
12.4 — Analyze Usage with Chronicle
Finally, review your Copilot CLI usage during the workshop with Chronicle:
/experimental
chronicle
Let's experience Agentic Workflow — combining GitHub Actions with Copilot (AI) to automatically run autonomous tasks in response to code changes.
What is Agentic Workflow?: A mechanism that uses Copilot inside GitHub Actions workflows to run autonomous tasks (report generation, documentation updates, code fixes, etc.) triggered by repository changes.
Installing gh aw
First, install the CLI tool for Agentic Workflow.
For local environments:
gh extension install github/gh-aw
For Codespaces or environments with network restrictions (pre-GA):
curl -sL https://raw.githubusercontent.com/github/gh-aw/main/install-gh-aw.sh | bash
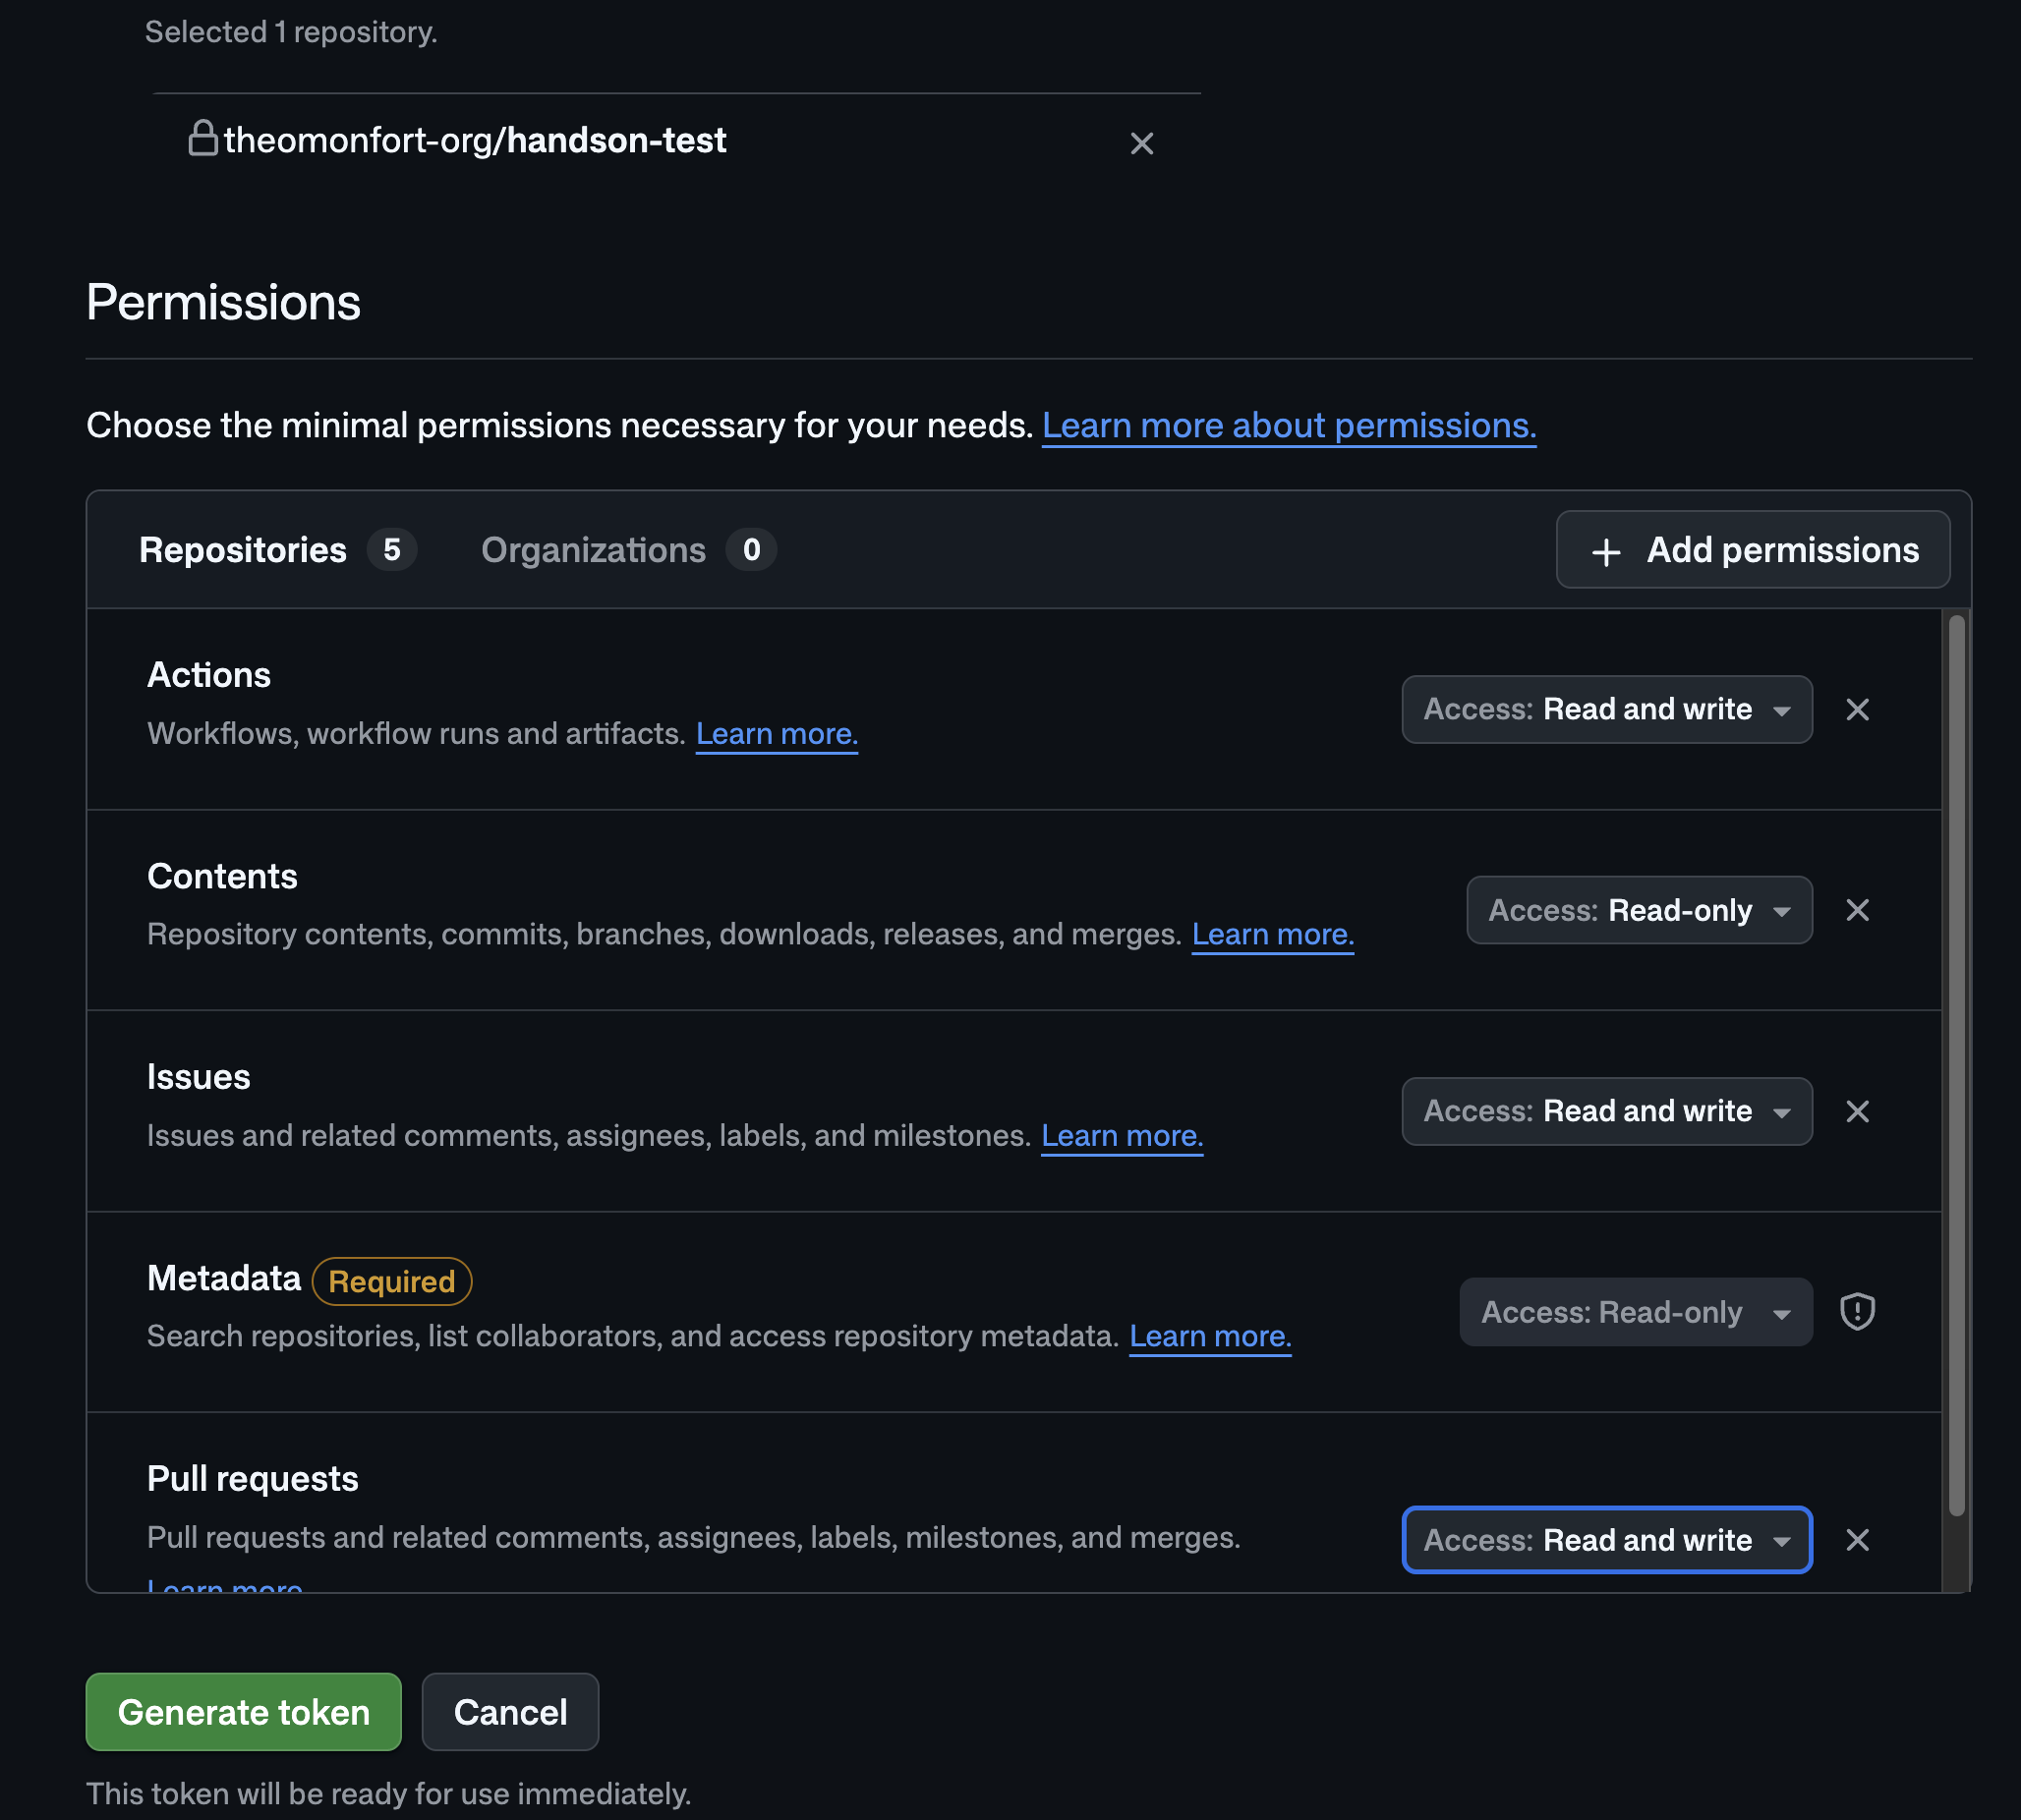
6.1 — Create a Personal Access Token (PAT)
Create a PAT to use Copilot in Agentic Workflow.
- Go to https://github.com/settings/personal-access-tokens/new
- Configure the following:
- Token name:
copilot-workshop-agent - Resource owner: The Organization (or personal account) where you created the repository
- Repository access: Only select repositories → select your repository
- Permissions:
- Actions: Read and write
- Contents: Read-only
- Issues: Read and write
- Metadata: Read-only (auto-granted)
- Pull requests: Read and write
- Token name:
 3. Copy the generated PAT
Set as a Repository Secret
- Repository Settings → Secrets and variables → Actions
- Click New repository secret
- Name:
COPILOT_GITHUB_TOKEN, Value: the PAT you just created
Verify Workflow Permissions
- Settings → Actions → General
- Check Allow GitHub Actions to create and approve pull requests
6.2 — Create the Daily Repo Status Workflow
Let's create an Agentic Workflow that automatically reports today's repository activity.
Run the following in Agent mode:
Please create the following Agentic Workflow.

File: .github/workflows/daily-repo-status.md

Purpose: Analyze repository activity (Issues, PRs, code changes) and
automatically create a daily status report as an Issue.

Format:
- Define configuration in YAML front matter (on, permissions, tools, safe-outputs)
- Write workflow instructions in the Markdown body

Configuration:
- Trigger: schedule: daily and workflow_dispatch
- permissions: contents: read, issues: read, pull-requests: read
- tools: github (lockdown: false, min-integrity: none)
- safe-outputs: create-issue with title-prefix "[repo-status] ",
  labels: [report, daily-status], close-older-issues: true

Workflow instructions:
1. Collect recent repository activity (Issues, PRs, code changes)
2. Analyze progress and highlights
3. Create a GitHub Issue with the results

Reference: https://github.com/githubnext/agentics/blob/main/workflows/daily-repo-status.md

When done, run `gh aw compile` to compile the workflow,
then commit the changes and open a PR.
After merging the PR, manually trigger the workflow from the Actions tab:
- Open the Actions tab in your repository
- Select Daily Repo Status from the left menu
- Click Run workflow → Run workflow
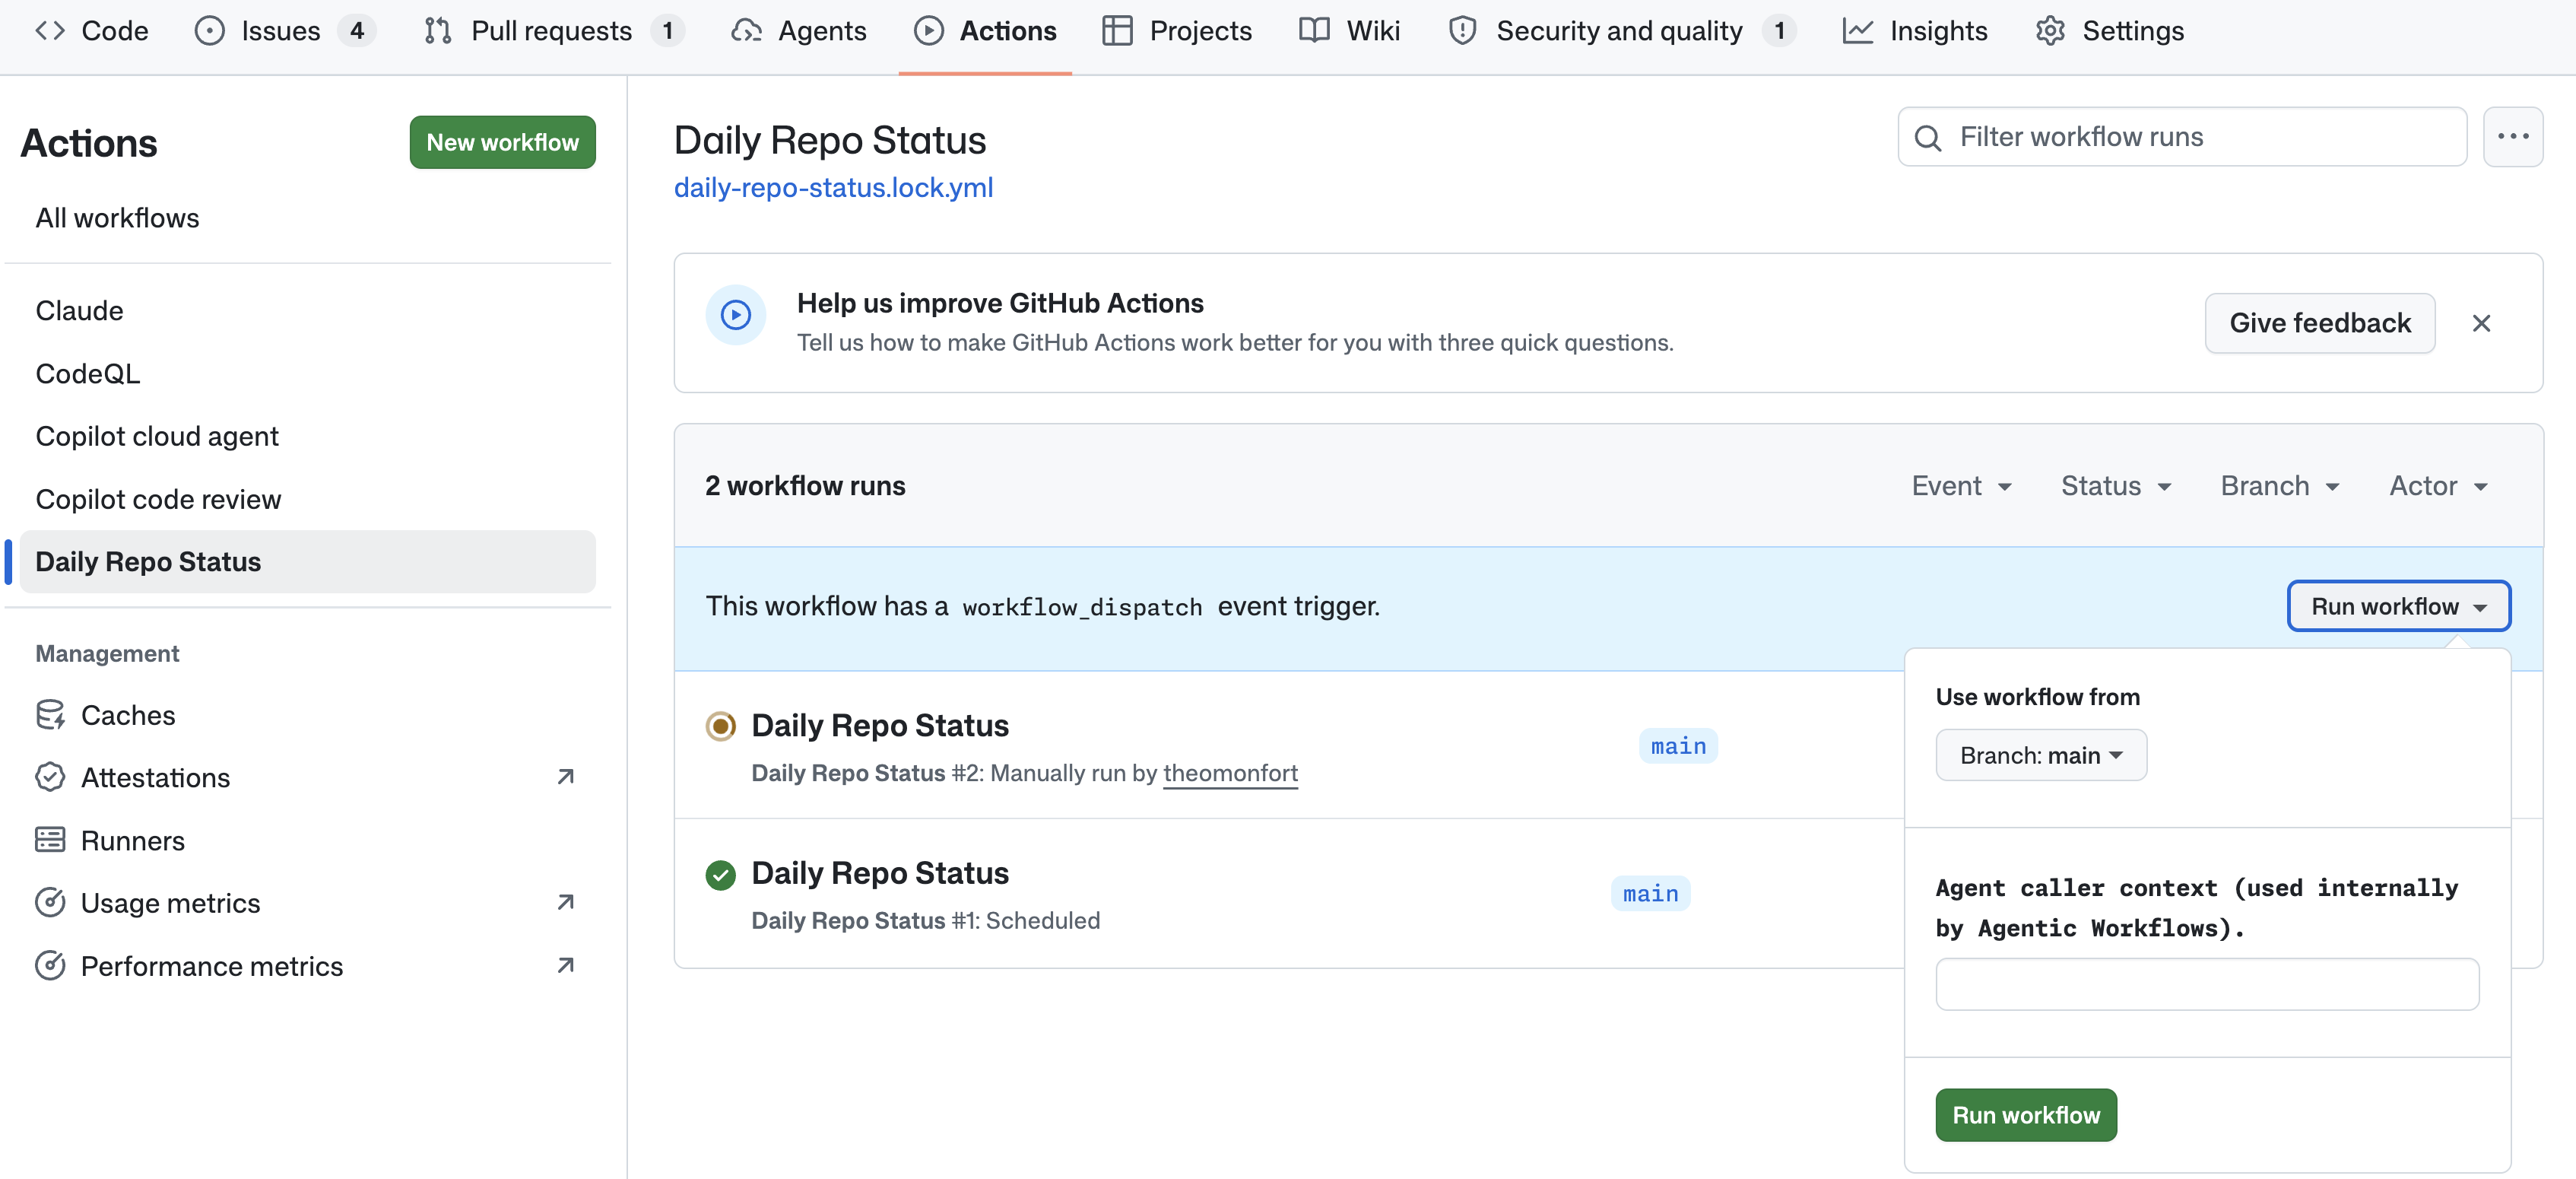
After execution completes (⏱ ~2 min), an Issue prefixed with [repo-status] will be automatically created in the repository's Issues tab, containing a summary of today's PRs, Issues, and code activity.
6.3 — (Bonus) Create a Test Coverage Auto-Update Workflow
If you have extra time, try creating a workflow that automatically updates the test coverage report.
Run the following in Agent mode:
Please create the following Agentic Workflow.
Reference: https://github.com/github/gh-aw/blob/main/create.md

Workflow purpose:
- Trigger on pushes to the main branch
- Run tests and generate a coverage report
- Auto-update coverage results as a badge in README.md
- Automatically create a PR if there are changes

Place the workflow file at .github/workflows/coverage-update.md.
What You Learned Today
In this workshop, you experienced GitHub Copilot end-to-end across the PLAN → CODE → REVIEW → TEST & SECURE → OPERATE phases:
- PLAN: MCP Server — Give Copilot fresh context via GitHub MCP and Context7
- PLAN: Instruction — Lock in Copilot's assumptions, style, and language with
copilot-instructions.mdand Path Instructions - PLAN: Skills — Install a Skill from awesome-copilot to automate Issue creation
- CODE: Copilot Chat — Design with Plan mode, implement the site with Agent mode
- REVIEW: Copilot Code Review — Ensure quality with automated PR reviews
- TEST & SECURE: Dependabot & CodeQL — Continuously detect dependency and code vulnerabilities
- TEST & SECURE: Actions — Automate Playwright tests with GitHub Actions
- CODE: Cloud Agent — Assign Issues to Copilot and let it implement in the background
- CODE: CLI — Move between Plan ↔ Agent from the terminal with Copilot CLI
- OPERATE: Agentic Workflow — Build autonomous CI/CD with AI using
gh-aw
Next Steps
- Use the Playbook as internal reference and share it with your team
- Try applying
/init→ Plan → Agent on real projects - Automate daily tasks with Cloud Agent and Agentic Workflow
- Integrate Copilot CLI into your everyday terminal workflow